


Table of Contents
- Professional vs DIY Water Mitigation: A Side-by-Side Comparison
- What Drives the Water Mitigation Cost in Your Home
- The DIY Water Damage Cleanup Risks Most Homeowners Underestimate
- How the Water Damage Insurance Claim Process Affects Your Bottom Line
- Secondary Water Damage Prevention: The Real Cost of Waiting
- When Professional Water Mitigation Is Worth the Cost
- Frequently Asked Questions
Last Updated: September 13, 2026
Professional vs DIY Water Mitigation: A Side-by-Side Comparison
Is professional water mitigation worth the cost? For most homeowners facing anything beyond a small, clean-water spill, yes. Professionals deploy commercial extraction, air movers, and dehumidification calibrated to IICRC standards; shop vacuums and box fans cannot dry a wall cavity before secondary damage sets in.
At Mr. Restore, we have watched this play out across thousands of properties. The homeowner who calls within hours usually faces drying and cleanup. The one who waits a week often faces subfloor replacement and a denied claim.
Here is the honest comparison:
| Factor | Professional Mitigation | DIY Cleanup |
|---|---|---|
| Equipment | Commercial extractors, air movers, dehumidifiers | Shop vac, fans, household dehumidifier |
| Drying verification | Thermal imaging, hygrometer readings, moisture mapping | Touch and appearance |
| Time to dry | Typically 3-5 days with monitoring | Weeks, often incomplete |
| Documentation | Photo logs, moisture readings for your adjuster | Usually none |
| Hidden moisture | Detected in wall cavities and subfloor | Rarely detected |
Equipment, Time, and Results Compared
The real difference is measurement. Professionals use thermal imaging and hygrometer readings to find hidden moisture in drywall and under subfloors, then verify dryness with data rather than guesswork.
DIY efforts often look successful while trapping moisture behind baseboards, and that gap is where the cost question gets decided.
What Drives the Water Mitigation Cost in Your Home
Water mitigation pricing depends on how far water traveled, what it touched, and how long it sat. No honest provider quotes a flat number before seeing the property.
The biggest variables:
- Water category: Category 1 water from a supply line is the simplest. Category 2 water carries contaminants. Category 3 water, often called black water, requires extraction, disposal of porous materials, and sanitization (the EPA).
- Square footage affected: Larger areas demand more equipment and longer drying cycles.
- Hidden moisture: Water migrating into wall cavities or under flooring adds drying time and equipment.
- Materials involved: Carpet, hardwood, and drywall each respond differently.
Water Category, Square Footage, and Hidden Moisture
A pipe burst upstairs is a very different job than a sewage backup in a finished basement. Category 3 water alone can change the scope from drying to removal and sanitization.
Moisture mapping with thermal imaging usually reveals more affected area than the visible stain suggests, and that discovery, not the puddle, drives the final scope.
Skipping moisture mapping is the most expensive shortcut homeowners take. Water trapped behind drywall feeds secondary damage for weeks before you notice a stain, and by then the repair scope has grown.
The DIY Water Damage Cleanup Risks Most Homeowners Underestimate
DIY water damage cleanup risks go well beyond a wet carpet. The three that catch homeowners most often are incomplete drying, contaminated water exposure, and invisible damage that surfaces months later.
- Incomplete drying: Fans move air but do not pull moisture from wall cavities. Trapped moisture warps hardwood and softens subfloor.
- Contamination exposure: Category 2 and Category 3 water can carry pathogens (the CDC). Without proper protective equipment and sanitization, you risk illness.
- Electrical hazards: Water and energized outlets are a dangerous combination (osha.gov). Professionals de-energize affected areas before work begins.
- No documentation: Without photo logs and moisture readings, your insurance adjuster has little to work with.
What most guides miss is that the DIY decision is not really about saving money. It is about whether you can prove the structure is dry. Most homeowners cannot.
How the Water Damage Insurance Claim Process Affects Your Bottom Line
The water damage insurance claim process rewards documentation. Adjusters approve claims they can verify and question claims they cannot, which is why professional mitigation often pays for itself even before you compare drying fees to repair bills.
Professional mitigation produces moisture mapping, thermal imaging records, and daily drying logs. That file does the arguing for you. A DIY cleanup typically produces a wet vacuum and a guess.
Denials, Deductibles, and Documentation
Two numbers decide most claims: your deductible and your coverage limit. You pay the deductible regardless, so the real question is whether the claim exceeds it enough to matter.
Denials usually trace back to four causes:
- No proof of sudden damage. Insurers distinguish a burst pipe from long-term seepage. Maintenance-related damage is commonly excluded.
- Delayed reporting. Waiting to file gives the insurer room to argue the damage worsened through neglect.
- Missing documentation. No moisture readings means no way to prove the extent of the loss.
- DIY work that obscures the loss. When a homeowner extracts water, discards saturated materials, and repaints before an adjuster inspects, the physical evidence of the covered event is gone. Adjusters cannot pay for damage they cannot see or measure.
That fourth cause is the one most homeowners never hear about until it is too late. A claim is not a receipt for work performed, it is a proof-of-loss exercise. The burden of demonstrating scope, cause, and date of loss sits with you, not the insurer.
What Adjusters Actually Ask For
In disputed claims, adjusters routinely ask for documentation the homeowner never generated:
- Moisture readings by room and material, taken at the start of drying and again at completion.
- Thermal imaging or photo evidence showing affected areas before and after.
- A drying log showing equipment placement, run times, and daily psychrometric readings.
- The date and cause of loss, supported by photos of the source (the burst supply line, the failed appliance hose, the roof penetration).
- Proof that drying reached acceptable levels, not just that the carpet feels dry.
A professional mitigation crew generates every one of those items as a byproduct of the job. That is the quiet value of hiring one: you are not just buying drying, you are buying the evidentiary record your claim depends on.
Photograph everything before cleanup starts: the source, the standing water, and every affected room. Then call your insurer and a restoration company the same day. Timestamped photos taken before extraction carry far more weight with an adjuster than ones taken afterward.
Why DIY Can Cost You the Claim, Not Just the Drying
The worst-case scenario is not a denied claim on a small loss. It is a denied claim on a large one because the homeowner tried to handle it themselves first.
Consider the sequence: a supply line fails overnight. The homeowner shop-vacs the standing water, pulls up wet carpet, runs box fans for three days, and calls the insurer on day four. By then, the visible water is gone, the carpet is in a dumpster, and the only remaining evidence is a faint stain on the subfloor. The adjuster sees a maintenance issue, not a sudden loss. The claim is denied or reduced. The homeowner pays for the subfloor out of pocket, on top of the DIY effort that produced nothing.
Professional mitigation inverts that sequence. The crew documents the loss on arrival, extracts and dries under a written protocol, and hands the adjuster a file that matches the insurer’s own expectations. Most carriers also work directly with a mitigation company on direct billing, so the homeowner is not fronting the full cost and chasing reimbursement.
The Bottom Line on Coverage
Insurance does not reward the cheapest response. It rewards the documented one. If you plan to file a claim, and for anything beyond a minor spill, you should, the cost of professional mitigation is frequently offset by the portion of the claim approved because the paperwork was done right. The homeowner who saves a few hundred dollars on DIY drying and loses a five-figure claim to missing documentation has not saved anything.
Secondary Water Damage Prevention: The Real Cost of Waiting
Secondary water damage prevention is a race against the clock, and the clock is measured in the physics of how water moves through building materials. Understanding that mechanism separates a homeowner who acts in hour one from one who waits until a stain appears.
How Water Actually Spreads Through a Structure
Water does not pool and wait. It wicks. Through capillary action, water climbs into drywall, travels along framing lumber, and migrates under flooring far beyond the visible wet area. A pinhole supply line leak behind a cabinet can saturate a ten-foot run of drywall and the subfloor beneath it before a single drop reaches the room.
Three mechanisms drive the damage:
- Capillary wicking pulls water upward and sideways through porous materials like drywall, wood, and concrete.
- Gravity moves water down through floor assemblies into ceilings and cavities below.
- Vapor diffusion pushes moisture as humidity into the air, where it condenses on cooler surfaces, which is how a wet room damages materials in an adjacent, seemingly dry space.
This is why moisture mapping with thermal imaging usually reveals more affected area than the visible stain suggests. The visible puddle is the smallest part of the problem.
The Compounding Timeline
The consequences compound in a predictable order:
- Hour 1-24: Water wicks into drywall, subfloor, and framing. Wood begins to swell. Relative humidity in the affected zone climbs.
- Day 1-2: Drywall saturation spreads; wood swells further; metal fasteners begin to corrode; the musty odor that signals microbial activity starts to develop.
- Day 3-5: Warping, delamination of engineered flooring, and visible staining appear. Drywall paper separates from the gypsum core.
- Week 2 and beyond: Structural materials degrade. Subfloor panels delaminate and lose load capacity. Framing lumber that stays wet long enough begins to soften at the grain. The repair scope expands from drying to replacement.
Each stage is more expensive than the last because each converts a drying job into a demolition-and-rebuild job. The cost of waiting is not linear, it is a step function, and the steps are steep.
Why the First 48 Hours Decide the Outcome
A crew that arrives in the first hour extracts standing water before it migrates, places air movers and dehumidifiers to interrupt the wicking process, and verifies dryness with instruments. A crew that arrives on day four is managing damage, not preventing it, the materials that were going to get wet already are. That is the entire argument for rapid response: the difference between drying a structure and replacing part of it.
Skipping moisture mapping is the most expensive shortcut homeowners take. Water trapped behind drywall feeds secondary damage for weeks before you notice a stain, and by then the repair scope has grown from drying to replacement.
The Hidden Costs of Improper Drying
The costs that do not show up on the mitigation invoice are the ones that hurt most:
- Callbacks and re-drying. A structure that was not dried to verified standards often has to be re-opened and dried again, doubling the disruption.
- Flooring replacement. Hardwood and engineered flooring that cupped or delaminated during a slow dry cannot be sanded flat, it has to be replaced.
- Subfloor and framing repair. Saturated subfloor panels lose structural integrity and must be cut out and replaced.
- Odor and air quality issues. Persistent musty odors signal that moisture remains in the assembly, even if surfaces feel dry.
- Insurance complications. A claim that grows because drying was incomplete invites scrutiny and can reduce the payout.
The Real Cost of Waiting
The question is not whether mitigation costs less than DIY. It is whether mitigation costs less than the restoration you will pay for when DIY fails. For most water damage beyond a minor spill, it does, and the gap widens with every hour the structure stays wet.
Water damage is a clock, not a puddle. The first 48 hours determine whether you are paying for drying or for rebuilding, and the difference is measured in the materials you keep versus the materials you replace.
When Professional Water Mitigation Is Worth the Cost
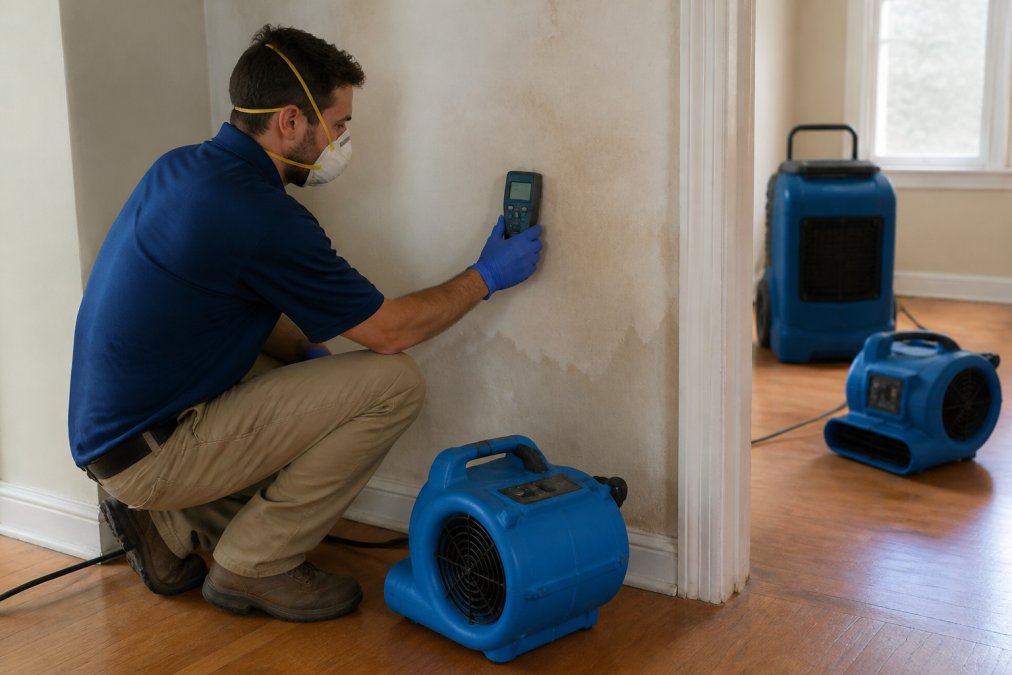
Professional water mitigation is worth the cost when water has reached wall cavities, when the source is contaminated, when the affected area exceeds a small spill, or when you plan to file an insurance claim. In those cases, the price of mitigation is almost always lower than the price of repair.
The math is straightforward. Mitigation removes water and dries the structure. Restoration replaces materials that were not dried in time. One is a service call; the other is construction.
Where DIY makes sense: a small, clean-water spill on a hard surface, caught immediately, with no wall penetration. Anything larger tips the balance.
The question is not whether mitigation costs less than DIY. It is whether mitigation costs less than the restoration you will pay for when DIY fails. For most water damage beyond a minor spill, it does.
Water damage rarely announces how far it has spread, and the first 48 hours decide whether you are paying for drying or for rebuilding. Mr. Restore is an IICRC-certified, family-owned team with 18 years of experience, a 60-minute arrival guarantee, and direct insurance billing that takes the paperwork off your plate. Our technicians document every moisture reading, work directly with your adjuster, and keep you updated in real time through our Job-Dox system, backed by 233 five-star reviews. Contact Us Online and get a crew moving before the damage spreads.
Frequently Asked Questions
Does homeowners insurance cover professional water mitigation?
Most standard homeowners policies cover water mitigation when the damage comes from a sudden, accidental event like a pipe burst or appliance failure. Slow leaks that went unaddressed for weeks are often excluded. Your water damage insurance claim process starts with a call to your insurer, followed by documentation of the loss. A restoration company that bills your insurer directly can reduce the paperwork burden and help you avoid out-of-pocket costs beyond your deductible.
Can I do water mitigation myself without specialized equipment?
You can remove standing water with a wet vacuum and run household fans, but you cannot measure what you cannot see. Hidden moisture inside wall cavities and under subfloors keeps spreading without extraction, air movers, and dehumidification sized to the space. Without a hygrometer or thermal imaging, you have no way to confirm the structure is dry. The DIY water damage cleanup risks include trapped moisture that damages framing and flooring long after surfaces feel dry to the touch.
Is professional water mitigation necessary for small leaks?
Small leaks still release water into materials that hold it. A slow supply-line drip can saturate drywall, baseboards, and subfloor over days. If the affected area is under roughly 10 square feet and you catch it within hours, fans and a dehumidifier may handle it. Anything larger, or any leak involving category 2 or category 3 water, needs professional extraction and drying to prevent secondary water damage. When in doubt, a moisture inspection settles the question quickly.
How does IICRC certification impact the quality of water mitigation?
IICRC certification means technicians are trained in the standards that govern drying, extraction, and documentation. That matters for two reasons. First, drying is measured against accepted thresholds, not guesswork, so the job is finished when the readings say so. Second, insurers recognize IICRC-standard documentation, which supports your claim. You can verify a company’s certification through the IICRC directory before you hire anyone, and ask for the certificate numbers of the technicians assigned to your project.