Many of us tend to forget about the roof during home maintenance routines. However, it is important to inspect your roof for damage regularly. Leaky roofs are a common cause of water damage in the home. That’s why your roof should have an inspection at least twice a year. You should also inspect your roof after each instance of severe weather. You can use caution and check the roof with assistance or have a professional come to your home. These are the areas that should be checked either by you or a professional:
1. Check from the Ground
Walk around your home outside to inspect the exterior of the roof from the ground. Look for any signs of:
- Damage
- Sagging
- Aging
You should also identify areas with moss, algae, or piles of leaves. These areas are well known for causing leaks and water damage. Take note of any possible problem areas. This way, you can remember to look closer later once you are on top of the roof.
2. Look at the Attic
Look for signs of water coming through under the roof if your home has an attic. If there is a water leak, you may see pooling water, water stains, or mold. Check out our extensive guide on how to spot water damage from inside your home.
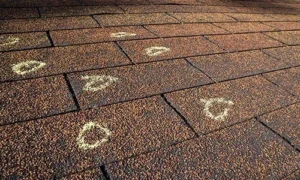
3. Inspect the Shingles
Once you have inspected the roof from the ground and checked the attic, you are ready to get on top of the roof. Look carefully at your shingles. Check to see if any are:
- Missing
- Damaged
- Aged
- Buckled
- Curled
All of these indicate roof damage. Missing or damaged shingles leave the roof in direct exposure to inclement weather. Buckled and curled shingles will appear to pull away from home. This will leave your roof and home at significant risk for weather damage and poor roof ventilation.
You should also look for granule loss. When the texture on the shingles gets worn or thin, this indicates that shingles are aged or affected by severe weather. These shingles are no longer protecting your home from damaging storms. Shingles that are no longer texturized need to be replaced.
4. Check the Flashings
Most roofs have counter flashing, a waterproof, protective layer of plastic, metal, or rubber that helps prevent runoff from weather from entering your home. They are installed over areas in need of additional protection against moisture. While you are on the roof, carefully inspect your counter flashing. When inspecting, note:
- Damage
- Cracks
- Shrinking sealant
Your roof and attic will be highly vulnerable to water damage if the flashing or its seal has deteriorated.
5. Clean the Gutters
In previous articles, we discussed the importance of cleaning out your gutters to prevent water damage. While you are on your roof, check your gutters, roof overhangs, and downspouts. During a severe storm, your gutters will get clogged with sticks, leaves, dirt, and other debris. Clogged gutters do not allow water to drain correctly and, in turn, will cause this water to leak into your home.
What to Do After Completing the Roof Inspection
Now that you have completed your roof inspection, ask yourself if you found any potential problem areas or major concerns. You need to contact a local professional immediately if that’s the case. Fix minor problems and concerns before they become disasters. A smart homeowner is a proactive homeowner. It’s the key to stress-free home maintenance.
If, while inspecting your roof, you find any water damage, give Mr. Restore a call right away. Ignoring water damage only leads to more problems. But don’t worry; our specialists can restore your home to as good as new.
